Tuesday, September 28, 2021

What is the endpoint of titration?

The point at which the indicator changes color is the endpoint of the titration. This is always indicated by the change in color of the reaction mixture.

What is titration in chemistry?

Titration is an analytical technique that uses a known concentration solution to determine the concentration of an unknown sample solution. In the titration technique, a solution with a known concentration is called a titrant, while a solution with an unknown concentration is called an analyte. It is a method of quantitative chemical analysis also known as titrimetry and volumetric analysis.

There are different forms of titration when it comes to procedure and goals, such as acid-base titrations, redox titrations, precipitation titrations, complexometric titrations. However, acid-base and redox are the most used types of titration in quantitative chemical analysis.


This method involves dropwise adding titrant from a burette to a conical flask containing titrand until the reaction is complete; an indicator is commonly employed to detect the reaction's endpoint. In some titrations, an indicator is not required since the reactants can act as self-indicator, or the endpoint is determined through the instrumental method.

What is the definition of endpoint?

“Endpoint refers to the point in the titration process where the color of the indicator changes”.

This is the point at which no more standard solution should be applied. For example, it can be determined by a color change in an indicator or the appearance of a precipitate. In titrations, the endpoint occurs after the equivalence point. It indicates that the equivalence point has been reached.

What is the endpoint of titration?

The endpoint in the titration process is the point at which the color of the indicator changes due to pH change. This happens throughout the titration procedure when the titrant and the sample compound are mixed.

It comes with or after the equivalence point and is considered an ideal point of end the titration. The indicators will change color at this point, and we will be able to get the readings to calculate the amount of the unknown analyte concentration.

For example, acids and bases are usually colorless. Therefore an indicator (e.g. Phenolphthalein) is used to determine the completion of a neutralization reaction that can change the color (e.g. Pink) of the reaction mixture with changes in pH (e.g. Neutral).

Titration does not always involve indicators. Instrumental methods are also used to determine the endpoint, since they work at a broad range of pH, provide rapid, and precise results. Examples, pH meter, auto-titrator, conductivity meter, potentiometer, karl fischer, and isothermal titration, etc.

What is the equivalence point and endpoint of a titration?

In chemistry, the equivalence point and endpoint both are important phases that are reached during performing the titration experiment. The majority of people believe they are the same thing, however, they are not.

In the process, the equivalence point is the point where the chemical reaction in the titration mixture ends, while the endpoint is the point where the indicator changes color to indicate that the titration is complete. The equivalence point is not always indicated by a change in the color of the solution and the endpoint is always indicated by a change in the color of the solution.


Frequently asked question (FAQ):

How do you find the endpoint of a titration?
The endpoint is usually coming after the equivalence point, which is the point at which the moles of a titrant equal the moles of titrand i.e. the ideal point for titration completion.

What happens at the endpoint of a titration?
At the endpoint of a titration experiment, the analyte has completely interacted with the titrant, in which the physical change occurs that signals the reaction is complete.

What is the best indicator to signal the endpoint?
“Phenolphthalein” is the ideal indicator for detecting the endpoint in the titration of a weak and a strong base that works in the range of pH 8 to 10.


Monday, September 27, 2021

Preparation of sulphuric acid solution

Learn how to make different concentrations of molar and normal sulphuric acid solutions, which are needed for many applications such as research, practical, pharmaceutical, chemical laboratory and industries, etc.

The density of sulfuric acid 98% is 1.84
The molecular weight of H2SO4 is 98.07 g/mol.
The normality of sulphuric acid is 36.8 (N).

Generally, 98% purity of sulfuric acid (H2SO4) is supplied in the market by vendors.

Because acid is a liquid, we must also consider density: density = mass/volume, which is stated on the label of bottle to be 1.84 g/ml. Therefore we have: volume = 98g / 1.84(g/ml) = 53.2 ml.

Now consider the acid purity, which is normally 98 percent, and proceed as: If the acid were 100 percent pure, convert in ml with a purity of 98 percent, therefore 100 percent x 53.2 ml / 98 % = 54.3 ml of (98%) concentrated acid.

We can use the below normality equation to prepare different normality of H2SO4:
(Conc. H2SO4) N1 V1 = N2 V2 (1N H2SO4)
36.8N x V1 = ?N x 1000 ml

We can use the dilution formula (98% X ml? =? % X 100) for the preparation of percent volume by volume solutions.


Requirements of glassware and apparatus:
Beaker, pipette, pipette bulb, volumetric flask, measuring cylinder, glass rod, distilled water, concentrated sulfuric acid (H2SO4).

How to prepare 0.005 M sulphuric acid:

Using a pipette, carefully mix 0.27 ml of concentrated H2SO4 with 500 ml of distilled water in a 1-liter volumetric flask. Make up the volume to 1000 ml with distilled water and properly mixed it.

How to prepare 0.1 M sulphuric acid:

Using a pipette, carefully mix 05.43 ml of concentrated H2SO4 with 500 ml of distilled water in a 1-liter volumetric flask. Make up the volume to 1000 ml with distilled water and properly mixed it.

How to prepare 0.5 molar H2SO4:

In a volumetric flask of 1 liter, using a pipette take 27.15 ml of concentrated sulphuric acid in 500 ml of distilled water, and properly mixing it. Allow to cool at room temperature, make up the volume to 1000 ml with distilled water.

1 M sulphuric acid solution preparation:

In a volumetric flask of 1 liter, using a pipette take 54.30 ml of concentrated H2SO4 in 500 ml of distilled water, and properly mixing it. Allow to cool at room temperature, make up the volume to 1000 ml with distilled water.

How to prepare 2 molar solution of sulphuric acid:

In a volumetric flask of 1 liter, using a pipette take 108.60 ml of concentrated H2SO4 in 500 ml of distilled water, and properly mixing it. Allow to cool at room temperature, make up the volume to 1000 ml with distilled water.

5 M sulphuric acid preparation:

Using a pipette, carefully mix 27.15 ml of concentrated H2SO4 with 50 ml of distilled water in a 100 ml volumetric flask. Allow cooling at room temperature and make up the volume up to 100 ml with distilled water and properly mixed it.

How to prepare 0.1 N sulphuric acid:

Using a pipette, carefully dissolve 2.72 ml of concentrated H2SO4 with 500 ml of distilled water in a 1-liter volumetric flask. Make up the volume to 1000 ml with distilled water and properly mixed it.

How to prepare 0.5 normal H2SO4:

Using a pipette, carefully dissolve 13.60 ml of concentrated H2SO4 with 500 ml of distilled water in a 1-liter volumetric flask. Make up the volume to 1000 ml with distilled water and properly mixed

How to prepare 1 N sulphuric acid solution:

In a volumetric flask of 1 liter, using a pipette take 27.20 ml of concentrated sulphuric acid in 500 ml of distilled water, and properly mixing it. Allow to cool at room temperature, make up the volume to 1000 ml with distilled water.

How to prepare 2 N sulphuric acid solution:

In a volumetric flask of 1 liter, using a pipette take 13.60 ml of concentrated sulphuric acid in 200 ml of distilled water, and properly mixing it. Allow to cool at room temperature, make up the volume to 250 ml with distilled water.

How to prepare 10% sulphuric acid solution:

Take 10.20 ml of sulfuric acid and add 500 ml of distilled water in a volumetric flask, and make up the volume to 1000 ml with distilled water.


Note:
  • Sulfuric acid is an extremely dangerous acid upon contact. Therefore follow laboratory safety measures (SOP) and please use extreme caution when preparing the solution concentrations.
  • When making acid solutions, it is recommended that always add (gradually) acid to water.
  • Since concentrated H2SO4 is toxic when inhaled, it should always be handled in a fume hood.
  • When handling H2SO4, always wear a chemical-resistant apron, gloves, and goggles to protect your eyes and skin.
  • Acid should be kept in a special cabinet made of wood. Since metal corrode rapidly when exposed to sulphuric acid vapors, wooden cabinets are better than metal cabinets for acid storage.
  • If acid splashes on your skin or in your eyes, wash it off with water for 15 to 20 minutes.
References:
  1. Acid & Base Normality and Molarity Calculator. Available Here
  2. ‘Making Solutions’. SEASTAR CHEMICALS, Available Here
  3. Wikipedia contributors. (2022, January 14). Sulfuric acid. In Wikipedia, The Free Encyclopedia. Available Here
  4. What Is the Normality of 2M H2SO4 Class 11 Chemistry CBSE.  Available Here

Saturday, September 25, 2021

Prepare and standardize 1M potassium permanganate

Learn about the preparation and standardization of 1M KMn04 through a laboratory experiment or practical.

Aim:

To prepare and standardize potassium permanganate (1M) using oxalic acid.

Principle:

There are several reactions in the volumetric analysis include the oxidation and reduction processes. An oxidizing agent is determined by titration with a reducing agent and vice versa. These titrations are called redox titrations. An example of redox titration is the standardization of KMnO4.

Potassium permanganate is a strong oxidizing agent and in an acidic medium, it oxidizes C2H2O4 to CO2. Because the reaction is slow at room temperature, the temperature is kept at 60° to 70° C throughout the titration or reaction. No indicator is required in this titration as KMnO4 is a self-indicator.

Prepare and standardize 1M potassium permanganate

The molecular weight of potassium permanganate (KMn04) is 158 g/mol.

How to prepare 1m potassium permanganate solution:

Take 158.00 gm of KMnO4 and dissolve in 800 ml of distilled water in a volumetric flask, heat for 1 hour on a water bath, cool, then filter through a sintered glass filter and add enough water to make 1000 ml.

How to prepare 1M oxalic acid solution:

Take 126.07 gm of oxalic acid and dissolve in 500 ml of distilled water in a volumetric flask, and properly mixing it. Once it has completely dissolved, make up the volume to 1000 ml.

Procedure for standardization of 1M KMnO4:

Using a pipette, take 10 ml to prepare 1 M oxalic acid solution into a clean and dry conical flask, followed by 10 ml dilute H2SO4 (sulfuric acid). Titrate with KMnO4 solution after warming the contents of the flask to 70°C. 

Continue titrating until you reach a faint pink color endpoint. To get accurate results, repeat the titration three times and note down the burette reading in the observation table.

Observation table:

Sr. No.

Content in conical flask


Burette reading

Volume of titrant used (ml)

Initial

Final

1


2


3


Mean:


Calculations:

The formula for calculating the molarity of KMnO4 is M1V1=M2V2.
Where, V1 = Volume of 1 M C2H2O4 solution = 10.00 ml
M1 = Molarity of C2H2O4 solution = 1M
V2 = Volume of KMnO4 solution
M2 = Molarity of KMnO4 =?
Therefore: M2= M1V1 / V2

Result:

The strength of the prepared potassium permanganate solution was found to be___M.


Commonly asked questions on titration are as follows.

What is the standard used in the standardization of potassium permanganate?
Because potassium permanganate is not a primary standard, oxalic acid or sodium oxalate can be used to standardize it.

Why do we standardize potassium permanganate?
We standardize potassium permanganate to determine the strength of the prepared potassium permanganate solution by using a solution of oxalic acid as a standard.


Wednesday, September 8, 2021

Calibration of UV Spectrophotometer

Learn the calibration process of the UV/VIS spectrophotometer which includes control of wavelengths using holmium oxide, resolution power using toluene in hexane, control of absorbance using potassium dichromate solution, and limit of stray light using potassium chloride solution.

UV-Vis (Ultraviolet-visible) spectrophotometry is a technique for measuring light absorption in the ultraviolet and visible wavelength range of the electromagnetic spectrum. Incident light can be absorbed, transmitted, or reflected as it strikes matters. Atomic excitation is caused by the absorption of UV-Vis light, which refers to the transition of molecules from a low-energy ground state to an excited state.


Purpose of the calibration of UV/VIS spectrophotometer:

The purpose of the calibration is to ensure the performance, result accuracy and to establish the reliability of the spectrometer. It is used in the qualitative and quantitative analysis of analytes based on beers lamberts law, hence we frequently need to check the performance of the instruments either internally or by a service engineer.

UV calibration is one of the basic requirements that ensure compliance with the standard as per the Indian Pharmacopeia (IP) and British Pharmacopoeia (BP). Instrument qualification test parameter consists of control of wavelength, control of absorbance, the limit of stray light, and resolution power.

Control of wavelength: It is a process by which accuracy is determined by scanning a known solution for maxima lambda.

Control of absorbance: It is a process by which accuracy is determined by manually scanning a chromophoric solution and recording the absorbance.

Limit of stray light: Stray light is electromagnetic radiation that is not necessary for spectrophotometer analysis and only interferes with the process.

Resolution power: It is the ability to resolve spectral characteristics and bands into their separate components.

Calibration of UV/VIS spectrophotometer

Preparation of solvents required for calibration:

Preparation of perchloric acid solution (1.4 M):

Take 11.50 ml of AR grade perchloric acid (70%) using a pipette, dilute up to 100 ml of distilled water in a clean and dry volumetric flask, and properly mixing it.

Preparation of Holmium oxide solution (4% w/v):

Take 01.00 gm of AR grade Holmium oxide and dissolve in 1.4 M perchloric acid solution with the aid of heating. Once it has completely dissolved, make up the volume to 25 ml.

Preparation of sulfuric acid solution (0.005 M):

Take 0.6 ml of sulfuric acid (H2SO4) using a pipette, dilute 2000 ml of distilled water in a volumetric flask, and properly mixing it.

Preparation of potassium dichromate solution:

Take 57 to 63 mg of AR grade previously dried potassium dichromate (K2Cr2O7) and dissolve in 1000 ml of 0.005 M sulfuric acid.

Preparation of potassium chloride (1.2 % w/v):

Take 01.20 gm of previously dried potassium chloride and dissolve in 50 ml of distilled water. Once it has completely dissolved, make up the volume to 100 ml with distilled water.

Preparation of toluene solution in hexane (0.02%):

Take 01.00 ml of HPLC grade toluene using a pipette, dilute in 50 ml of HPLC grade hexane in a volumetric flask, and properly mixing it. Take 0.5 ml of this solution and again dilute to 50 ml with hexane.

Calibration Procedure:

The following are calibration parameters of UV visible spectrophotometer and their stringent limits are adopted from IP, USP, and BP pharmacopeia for acceptance criteria. For instrument operation, follow the standard operating procedure (SOP) and operating laboratory guidelines.

Cuvettes qualification:

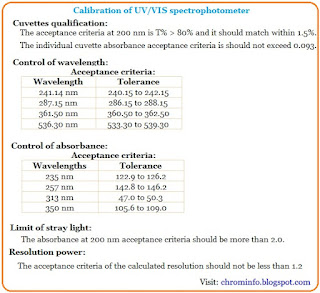
Take the transmittance of the cleaned and blank cuvette at 200 nm. The acceptance criteria at 200 nm are T% > 80% and it should match within 1.5%.
Fill the cuvette with Millipore water take the absorbance at 240 nm note down the reading. The individual cuvette absorbance acceptance criteria is should not exceed 0.093.

Control of wavelength:

Take the UV spectrum of Holmium oxide filter or prepared 4%w/v Holmium oxide solution in the range of 200 nm to 600 nm using 1.4 M perchloric acid as a blank.
Acceptance criteria:

Wavelength

Tolerance

241.14 nm

240.15 to 242.15

287.15 nm

286.15 to 288.15

361.50 nm

360.50 to 362.50

536.30 nm

533.30 to 539.30


Control of absorbance:

Take the absorbance of the 1.2 % potassium dichromate at the wavelength given below, and calculate the value of A (1% 1cm) for each wavelength. A (1% 1cm) = absorbance x 1000 / weight of K2Cr2O7.
Acceptance criteria:

Wavelengths

Tolerance

235 nm

122.9 to 126.2

257 nm

142.8 to 146.2

313 nm

47.0 to 50.3

350 nm

105.6 to 109.0


Limit of stray light:

Using water as a blank, measure the absorbance of the prepared 1.2 % potassium chloride solution using a path length of 1 cm at 200 nm. The absorbance at 200 nm acceptance criteria should be more than 2.0.

Resolution power:

Take the UV-spectrum of prepared 0.02% v/v toluene solution in the range of 250 nm to 300 nm using hexane as a blank. Record the absorbance at 269 nm for the maxima and 266 nm for the minima. The acceptance criteria of the calculated resolution should not be less than 1.2.


You may also like this

Monday, September 6, 2021

HPLC Injector and Types of HPLC Injector

HPLC injection is a technique to inject the sample without disturbing the flow rate and pressure of the HPLC system. The working pressure of an HPLC is adequately high that we cannot inject a sample into the mobile phase by inserting a syringe, so we need an injector that gives a reproducible result and without interrupted the flow rate and system pressure. Nowadays HPLC sample injectors are set in a different range of volume so you can inject the specific requires volume.

Here are certain requirements of HPLC Injector are as follows.
  1. Introduce the Sample with constant pressure and flow rate of the HPLC system
  2. Introduce the sample without air bubbles
  3. The injection volumes of the sample are in microliter so it should be accurate
  4. The sample must be free from any particulate matter

How many types of HPLC injectors are there?

There are three types of injectors are available for HPLC systems such as Rheodyne, septum, and stop flow injector. However, in an advanced HPLC system, an Autosampler is also used to auto-inject the precise volume of the sample.

HPLC injector and its types

Rheodyne injector:

The most commonly used injector is Rheodyne which is easy to use with high accuracy and precision. As per requirement, the analyst can set the volume of the sample loop. Rheodyne has two positions load and inject. The load position allows loading the sample into a loop with the help of a syringe which is commonly used to sample load into the injector.

After a load of the sample, manually rotates of the sample injector to the inject position allows flowing the sample onto a column without any air bubbles, without disturbing flow rate and pressure.

Septum injector:

In this system, the sample injects through the rubber septum. The septum is an interface for injecting the sample solution and is used to seal the injection port. It is not commonly used, as the septum must withstand high pressure.

Stop flow injector:

In this type of system mobile phase stopped while the sample is injected. The formation of ghost peaks in the analysis of analyte is the disadvantage of this technique.

Auto-sampler injector:

It is an automatic sample injector that uses to deliver an aliquot of sample to the HPLC column. It is high-tech automation equipment with high precision, variable volume, and long-term reliability. It consists of a valve, a sample dosing, and a moving sampling needle.

Principle of manual injection:

In the load position, using a syringe a sample is filled in a sample loop. The sample loop is shifted to the high-pressure section of the HPLC system when the knob is turned to the inject position. Valves with six ports and two positions for loading and injection are typically used. The most economical way to introduce samples is through manual injection valves.

Several parts are related to the injector of the HPLC system they are injection valve, pulled-loop, pushed-loop, sample container, sampling needle, sample compartment, needle wash port, and pressure transducer.

Commonly asked questions are as follows.

Which syringe is used to inject sample HPLC?
A blunt tip syringe of 22-gauge is used to inject a sample solution into the sample loop. It usually features a stainless steel plunger that is individually fitted to the glass barrel, this allows us to use varied injection volumes.

What is an injection in HPLC?
In chromatography, injection is an important step. The goal is to inject the sample to be analyzed into the HPLC; In general, two injection systems will be available: manual and automatic injection. The volume of the injection loop has a significant impact on the amount of sample injected. Injection loops range in size from 1 to 100 µL.


Principle and Procedure of HPTLC Chromatography

Learn the principle, types, applications and how HPTLC works.

What is High-Performance Thin Layer Chromatography?

The HPTLC technique is an automated and sophisticated form of thin layer chromatography with superior and advanced separation efficiency and detection limits and is often an exceptional alternative to high-performance liquid chromatography (HPLC) and gas chromatography (GC). The high-performance thin-layer chromatography is also known as flat-bed chromatography or as planar chromatography.

HPTLC Principle:

The HPTLC works on the same principles as TLC such as the principle of separation is adsorption. The mobile phase or solvent flows through the capillary action. The analytes move according to their affinities towards the stationary phase (adsorbent). The higher affinity component travels slower towards the stationary phase. A low-affinity component travels rapidly toward the stationary phase. On a chromatographic plate, then, the components are separated.

Experimental Procedure of HPTLC:

Before beginning an experiment, we must recognize the various components essential to perform the process.

1. A tool suitable for sampling as bands to monitor the size and position of the test, as well as the sample volume applied.
2. An appropriate chromatographic chamber that provides developing distance and control of saturation.
3. A device appropriate for controlling stationary phase behavior through relative humidity.
4. A tool appropriate for reproducible drying of the developed plate.
5. Appropriate equipment for reagent transfer and heating.
6. A tool for electronic documentation of chromatograms.

Stepwise procedure:

1. Sample Preparation:
This requires a highly concentrated solution since much less sample quantity needs to be applied. The plate’s solvents must be non-polar of the volatile type. Polar solvents are commonly used to dissolve samples for reversed-phase chromatography.
2. Selection of Chromatographic Layers:
The layer of HPTLC is available in the form of very fine particle size silica gel pre-coats which are widely used as adsorbents.
3. Pre Washing:
To water vapor or volatile impurities, the plates must be cleaned. It may be clean with a suitable solvent such as methanol.
4. Conditioning:
Plates are placed in an oven at 120° C for 15 to 20 minutes to perform conditioning.
5. Sample Application:
The size of the sample spot is not greater than 1 mm in diameter. There are various methods for spotting samples. One is a self-loading capillary in which small quantities of samples can apply to the HPTLC plate.
6. Pre-Conditioning:
Saturation is necessary for highly polar mobile phases although there is no need for saturation for low polarity mobile phases.
7. Mobile Phase of HPTLC:
Through trial and error, the mobile phase of the suitable solvents is to be selective.
8. Chromatographic Development:
The linear development method in high-performance thin-layer chromatography is the most common technique here the plate is positioned vertically in an appropriate container with a solvent or mobile phase. The mobile phase is generally fed by capillary action and both sides may produce chromatograms.
9. Detection of spot and Scanning:
The instrument has attached to computer and data recording devices. The development of spots is viewed as peaks at wavelengths of selected UV regions. The height and the area of the peaks are determined by the instrument and recorded as a percentage.

HPTLC Applications:

  • High-performance thin-layer chromatography is used to analysis of molecules in both qualitative and quantitative terms.
  • It can estimate the concentration of components although TLC can only separate components.
  • It can analyze a complex structure or a very small amount of compounds.
  • This method is used in the food industry to evaluate nutrients, beverages, vitamins, and pesticides in fruit, vegetables, and other foodstuffs.
  • It is useful in the forensic detection of substances, including adulteration, overdose, counterfeit drugs, and drug misuse.
  • To identify the substances including drug abuse, overdose, adulteration, counterfeit drugs it is used forensic dept.
  • HPTLC is used in pharmaceuticals for quality control.
  • It is used for the analysis of forced degradation studies, stability testing, and to check the presence of impurities in the drug.

Advantages of HPTLC:

  • More than one analyst works on the system simultaneously.
  • It can be sharable, as it is not devoted to any sample.
  • The pre-coated plates of HPTLC are available at low prices.
  • There is less maintenance cost as compared to other equipment.
  • It has a wide range of stationary phases.
  • It has no risk of contamination, since the use of the freshly prepared mobile phase and stationary phase.
  • Mobile phases are not required for filtration and degassing such as HPLC.
  • It is highly sensitive, reproducible, and precise as compared with a thin layer chromatography.

Disadvantages of HPTLC:

  • Short separation bed is a major disadvantage of HPTLC.
  • A limited number of samples per plate can be tested.
  • Sometimes silica gel is present during detection.

Commonly asked questions on HPTLC chromatography are as follows.

What is the principle of HPTLC?
HPTLC has similar approaches and follows the same physical principles as TLC, i.e. adsorption chromatography.

What type of chromatography is HPTLC?
HPTLC is a type of planar chromatography and is the most advanced instrumental method of TLC.

What is the HPTLC plate made of?
Silica gel is widely used for plate preparation. HPTLC plates are available on a glass or aluminum support with various sorbent materials.

What is the major advantage of high-performance thin-layer chromatography?
Its main advantage is that it is capable of simultaneously analyzing multiple samples.